While I was browsing around trying to find inspiration for this week's homework, I found some YouTube videos with fashion design / drawing lessons.
I leave you with this one, a tutorial on how to draw the basic standing figure, similar to what I draw in my first class. However, I find it much more complicated in the tutorial than in our class. But there are different learning and teaching styles out there, and these videos might be useful to understand the technique.
Enjoy and learn!
Basic Standing Figure Tutorial: Fashion Design Drawing Lesson by FashionARTVentures
Tuesday, April 30, 2013
Sunday, April 28, 2013
Drawing for the first time a three quarter (3/4) pose (and a red gown)
WEEK 2 , April 27
Fashion design class number two. Firstly, my homework was
appreciated and I've been told I’m one of those people obsessed with details.
Right, that’s definitely true J
So yesterday we learned how to draw the ¾ pose and how to
render different clothing details such as: shirt collar, knot, cowl, bow,
flares, gathers, ruffles or frills. It was hard to keep up with the teacher
while she was drawing examples of these, so I ended up kind of copying what she
was doing, but I can’t say my drawings are looking as natural as hers looked.
The ones below I re-drew them at home. I still need to work on it, but it is
good for exemplification.
.jpeg)
.jpeg)
.jpeg)
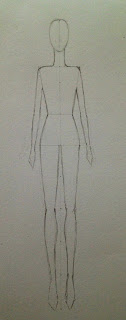
Now the ¾ (three quarter) pose. I took some pictures of my drawing
before I put clothes on it so I can keep track of the technique. It is not as
difficult as I expected. You will start with the same 9 inches vertical line,
marking all the 9 inches. For the upper part of the body, the two sides of the
body are not equal like in the front pose, but one of the sides is slightly
longer (so the vertical line will no longer be in the center, but slightly to
the left side. Then the left leg comes on the left side of the vertical line
and the right leg will go back behind the left one. In this specific pose we
don’t see the right arm.
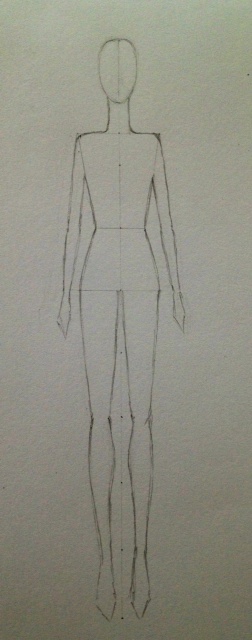
Very important here is drawing the bust line, which in this
pose is going out slightly on the right side (remember the bust line is a bit
under the underarm line).
After drawing the pose we were asked to put some clothes on
it, whatever we want, using some of the earlier techniques.
I dressed my girl with a one shoulder red gown, with a
train, mermaid style. The dress has an over-sized bow on the left shoulder. For
the red color I used the markers, however now I find out that there is a
specific paper for the markers, called marker paper. For the first time I
colored the skin with one of the markers.


.jpeg)
Next time we will learn a different ¾ pose and a back pose.
The good news is that we do not have to draw these poses all the time we want
to design something. After we perfect our poses we will have templates for each
pose and we will just copy it onto a sheer paper.
I will tell you about the homework for this week and some
other stuff we learned in my next post.
Thursday, April 25, 2013
Practicing the front pose - Homework number one
Fashion design, HOMEWORK WEEK 1: April 25
Hello there! I wish all the homeworks in school were as excited as this one! As I previously mentioned, our homework for the week one was to find something we like in a magazine or wherever and draw it.
.JPG)
.jpeg)
.jpeg)
.jpeg)
.jpeg)
.jpeg)
.jpeg)
Hello there! I wish all the homeworks in school were as excited as this one! As I previously mentioned, our homework for the week one was to find something we like in a magazine or wherever and draw it.
I stuck to my intention to draw this Carolina Herrera outfit
(I just saw it one day on a Facebook page, so I can’t really confirm which
collection and if really is CH). There are few reasons I choose this outfit
(which is not necessarily the most glamorous choice):
.JPG)
- The blouse is inspired by the traditional Romanian blouse called “ie” (the same that inspired Matisse to do the painting that is the background of this blog). So you see the red thread here? J
- The color of the blouse – I wanted to try to draw the white blouse, it seemed to me it was more difficult that to draw something in another color. So I wanted to try.
- The skirt has the lace element to it, as well as a the frills – again, had a moment to think how to render at least an idea of lace (something we will be probably taught at a later stage)
- The front pose is the only one we learned how to draw, and this one looked easy enough
.jpeg)
.jpeg)
.jpeg)
.jpeg)
.jpeg)
.jpeg)
The colors are not exactly the original ones, but had no
other blue. I actually had a darker blue in markers but I don’t know how to use
them yet, I have a feeling there is a trick to it as when I tried to use it, it didn't really look nice. So I used the colored pencils and a normal H pencil. I
only used the markers for the hair and for the shoes.
I have to say, the part it I really got frustrated at was
the mouth…
That’s it for now, I can’t wait for my next course J
Monday, April 22, 2013
My introduction to fashion design
WEEK ONE: 20 April 2013
Last week I started a fashion design course. I always felt I
have a creative side it cannot be explored because of my lack of skills. So, I
decided it is not too late to learn something new, and I found the perfect course
for me to figure out if I have anything to give in this industry and explore my
creativity.
I will keep a diary of my progress – as an experiment. I
want to see how much we can actually progress in something new that we pursue,
I want to keep a track of challenges and all the feelings throughout this
process.
The moment I started to draw on paper, I had an involuntary
smile. I think is a good sign.
So, in the first class (3 hours) we learned how to draw a
fashion figure, the CROQUI. I knew there is a technique behind this, but I didn’t
know it, so my attempts to draw something looking like a human being were
ending up in frustration. One of my colleagues at the course, who said already
has a line of clothes coming out, was worst than me, so yes, there is hope.
So, the course has in total 30 hours, 3 hours every
Saturday, for 10 weeks.
I will start with what materials we need for the first
course (there are other materials but I will introduce them as we start to use them):
- One 10, 12 inches ruler (9 inches minimum)
- HB pencils
- Eraser
- A4 sketching paper
The process of actually drawing a fashion figure starts with
drawing a 9 inches vertical line in the middle of the sheet. Mark every inch.
In the picture below you will see the proportions for different parts of the
body. On the left side it’s the raw fashion figure. On the right side is the
figure after we rounded the shapes of the body.
.jpg)
Another thing we
started to look into in this class is how to draw clothes on a figure. The big
thing here is that the clothes need to flow. There are no straight lines, they don’t go on
the same lines as the nude figure lines. Someone asked how you draw tight pants
– so there are many more secrets and techniques to drawing the clothes and
looking forward to it.
The other important thing we learned is how to draw the face
details. You wouldn't believe, but the most difficult part of the face is
drawing the egg shape! And believe me, if the egg is not right, your lady will
look like an alien, or a monkey J
Ahh, I forgot to mention, I was pretty good when it came to
drawing the first figures, but in my last attempt, when I actually put some
clothes on it, I made it FAT! And the lesson I learnt is that if you make the
shoulders too broad, and keep the proportions, your figure will be fat and too
big compared to the head.
Homework
Our homework is to choose a picture with some clothes we
like and draw them on our own croqui. No creativity, the teacher said, just
draw what you see. There might be a reason for that! I already choose mine, and
if I don’t change my mind, it will be the below (which I think is Carolina Herrera); it will be pretty difficult, especially the blouse, so it will be a challenge. My next question for the
teacher is how you draw a white garment – and make it look different than the
color of the paper.
.JPG)
Inspiration
Another assignment we have is to start compiling a folder
with things that inspire us – it can be anything, not necessarily clothes. I
have this fantasy of being inspired by nature, but for now this is the first
inspirational image I will add to my virtual folder – a painting of my favorite
artist, Gustav Klimt. I am trying to imagine what would this girl wear, and in
the middle of the night I came up with this idea (the drawing on the right
side). I didn't have exactly the colors I was looking for, the brown would be
darker, the blue will be deeper, the yellow is actually gold.
.JPG)
Anyone can guess what was my inspiration for the dress?
Subscribe to:
Comments (Atom)